
A PHP application basically involves PHP scripts which handle data exchanged between clients at remote terminals and a server site which processes and registers the data on some storage facility, usually one or more databases, and serves them to the clients on their requests.
The present chapter shows sample scripts to handle the basic operations involved in these proceedings:
| - | presenting a data entry form to the client |
| - | retrieving the data entered by the client |
| - | handling the basic database operations: creating databases and tables, inserting and retrieving data from the databases |
1. SAMPLES |
Appendix 1. Installing the supporting software shows how simply to install an Apache Web server, and a PHP processor, and to set the system to work.
To call the sample scripts directly from the samples directory, you can create an alias for this directory, and call the scripts under this alias.
In a Windows system, suppose you installed the present document package in the directory 'C:\books\PHP\', then the samples directory has the path name 'C:\books\PHP\samples\' (please, check). You define an alias, say hpp, for this directory by adding the following line to the Apache configuration file (%ApacheHome%/conf/httpd.conf -- where %ApacheHome% represents the directory where you installed the Apache system):
Alias /hpp "C:/books/PHP/samples" |
Then you would be able to request a script called somescript.php from the samples directory, by entering the following line from an Internet Explorer or a Netscape navigator or any other browser, window:
http://localhost/hpp/somescript.php |
1.1 A simple PHP page |
<!-- MyFirst.php --> <HTML><HEAD> <TITLE>MY FIRST PHP PAGE</TITLE> </HEAD> <BODY style="background-color:#99EEBB;"> <IMG src="images/Snowdrop.png"> <b style="color:red; padding:5em;"> <?PHP echo "Hello, world!"; ?> </b> </BODY> </HTML> The PHP code is the text sequence in blue characters, enclosed within a starting and an ending mark:
|
Depending on your Internet provider, you may have to manually establish a connection before being able to call any page from the Internet.
The result will look like this:
 Hello, world!
You can display the page source which shows as:
<HTML><HEAD><TITLE>MY FIRST PHP PAGE</TITLE></HEAD>
<BODY style="background-color:#99EEBB;">
<IMG src="Images/Snowdrop.png">
<b style="color:red; padding:5em;">
Hello, world!</b>
</BODY>
</HTML>
This page was processed by your browser to display what you see, then saved among the Internet Temporary files. |
If you installed Apache and the PHP system as suggested above, you can run the script which is also contained in the samples directory, by submitting the following request:
http://localhost/hpp/MyFirst.php
Normally, you can submit it from this page.
1.2 Client/Server communication |
In this example, an HTML page is first used for the client to fill in specific information which is sent to the server along with a request for a PHP page. The latter is an HTML page to be complemented by the information sent in by the client. Client information is merely sent back. This is just an example to show how things work. The next paragraph will show how information can be retrieved from a database.
The first code shown below is a regular HTML page that contains a FORM element (a working knowledge of HTML helps.)
HTML data entry form
DataEntry.html (may not work -- explanation follows ...)
<!-- DataEntry.html --> <HTML><HEAD><TITLE>DATA ENTRY</TITLE></HEAD> <BODY> <FORM ACTION="DataRetrieve.php" METHOD="POST"> <TABLE> <TR><TD style="color:blue;"><b>First Name</b> <TD><INPUT TYPE="text" NAME="firstName" STYLE="background:lime"> <TR><TD style="color:blue;"><b>Last Name</b> <TD><INPUT TYPE="text" NAME="lastName" STYLE="background:lime"> <TR><TD style="color:blue;"><b>e-mail</b> <TD><INPUT TYPE="text" NAME="eMail" STYLE="background:lime"> <TR><TD style="vertical-align:top; color:blue;font-weight:bold;">Sex: <TD><INPUT TYPE="radio" NAME="sex" VALUE="M">Male<BR> <INPUT TYPE="radio" NAME="sex" VALUE="F">Female <TR><TD colspan="2"> <SPAN STYLE="color:blue;font-weight:bold;"> Favourite occupations</SPAN> <br>- please click one or more <TR><TD><TD><INPUT TYPE="checkbox" NAME="riding">Horseback riding <TR><TD><TD><INPUT TYPE="checkbox" NAME="hunting">Fox hunting <TR><TD><TD><INPUT TYPE="checkbox" NAME="bird">Bird watching <TR><TD><TD><INPUT TYPE="checkboxx" NAME="travels">Travels <TR><TD><BUTTON TYPE="submit" NAME="sub"><b STYLE="color:red"> SUBMIT</BUTTON> </TABLE></FORM></BODY></HTML> - 3 INPUT text type fields - 2 INPUT radio type fields - 4 INPUT checkbox type fields In the HTML source page, these fields are identified by the value of their NAME attribute. They are made to stand out in blue characters. PHP comes in through the ACTION attribute value 'DataRetrieves.php' which references the PHP page to be scheduled when the user clicks on the 'SUBMIT' button. The attribute METHOD=POST specifies that the data from this page are to be retrieved by PHP using the POST method (the consequence of which will be seen in the next script below). The HTML data entry page as displayed to the user looks like this: |
PHP data retrieving page
Shown on the left is the source code of the PHP page to be scheduled when the SUBMIT button of the above Data Entry HTML page is clicked. This page in an HTML page interspersed with PHP code. The scheduling is done by the PHP processor which has to be installed as part of the Web Server, also to be installed before any PHP processing can be considered.
<!-- DataRetrieve.php -->
<HTML><HEAD>
<TITLE>DATA DISPLAY</TITLE>
</HEAD>
<BODY>
<DIV style="font-size:120%;
     font-weight:bold; color:red;
     text-align:center;
     margin-bottom:2em; ">
DATA RECEIVED
</DIV>

<TABLE>
<TR><TD>First name
    <TD><?php print ($firstName) ?>
<TR><TD>Last name
<?php print ("<TD>$lastName");
      print ("<TR><TD>e-mail");
      print ("<TD>$eMail") ?>
<TR><TD>Sex
    <TD><?php print ($sex) ?>
<TR><TD>Favourites
<TR><TD>Horseback riding
    <TD><?php print($riding) ?>
<TR><TD>Fox hunting
    <TD><?php print($hunting) ?>
<TR><TD>Bird watching
    <TD><?php print($bird) ?>
<TR><TD>Travels
    <TD><?php print($travels) ?>
<TR><TD>
<FORM ACTION="DataEntry.html">
  <BUTTON TYPE="submit" NAME="html">
  NEXT</BUTTON>
</FORM>
<FORM ACTION="TheEnd.html">
 <BUTTON TYPE="submit" NAME="end">
 END</BUTTON>
</FORM>
</TABLE>
</BODY>
</HTML>
The PHP processor executes the PHP code present in the page. This code is made up of the text portions enclosed within the <?php ... ?> tags. These are all of the text sequences set in blue characters.
The first sequence is print($firstName). It involves a print function and a $firstName variable. A PHP variable always starts with the $ sign. This variable here has the same name as an INPUT field from the calling HTML page. It is set to the value of this field when the PHP page is scheduled. The print function has an argument enclosed within parentheses. It writes this argument out onto the PHP page, at the position where it is located. Everything that a print function writes out goes to the PHP page. Instead of merely printing out the PHP variables, the function can write out HTML elements. In print("<TD>$lastName"), the element <TD> is written out, followed by the value of the variable $lastName. The latter is said to be expanded, i.e. it is replaced by its value before printing occurs. The next print writes out pure HTML code: <TR><TD>e-mail. After all of the PHP statements are excuted, the HTML page as resulted from the unchanged original HTML code (in black), and the results of the print functions, is sent to the client side, i.e. to the browser from which the DataRetrieve.php page was called. The $sex variable is associated with a set of radio type fields, with the same name, but different values, as specified by the 'value' attribute. The value it receives is that of the selected field. The INPUT fields of the checkbox type have each its own name. Such a field has a value of "ON" when selected; when not selected, it is not present in the data flow emitted by the HTML page, and the corresponding variable in the PHP page is not defined (which is different from being an empty string, or having a null value.)
|
<HTML><HEAD><TITLE>DATA DISPLAY</TITLE></HEAD>
<BODY><DIV style="font-size:120%; font-weight:bold;
     margin-bottom:2em; text-align:center;
     color:red">DATA RECEIVED</DIV>
<TABLE>
<TR><TD>First name<TD>Jack
<TR><TD>Last name<TD>Russell
<TR><TD>e-mail<TD>jrussell@terrier.ca
<TR><TD>Sex<TD>M
<TR><TD>Favourites
<TR><TD>Horseback riding<TD>on
<TR><TD>Fox hunting<TD>on
<TR><TD>Bird watching<TD>on
<TR><TD>Travels<TD>
<TR><TD><FORM ACTION="DataEntry.html">
<BUTTON TYPE="submit" NAME="html">NEXT</BUTTON>
</FORM>
<FORM ACTION="TheEnd.html">
<BUTTON TYPE="submit" NAME="end">END</BUTTON>
</FORM></TABLE>
</BODY></HTML>
|
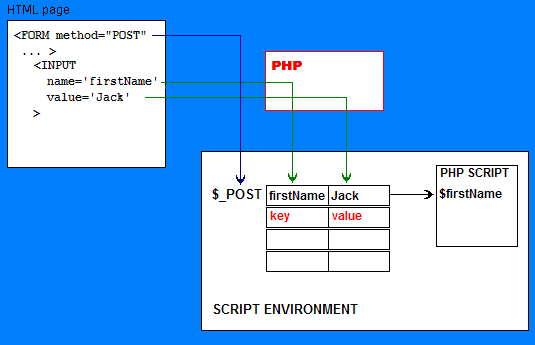 All that was explained above might not work, i.e. the data fields in the result might be undefined. This would be because your PHP processor has a protection set on, which prevents the received data from being directly set into the intended variable ("Jack" would not go to
 $firstName).
Data received from the client are to be found in the so-called superglobal array $_POST. The $_POST array is created by the PHP processor, when data are received through the POST method. In this array, the keys are the names of the INPUT elements from the user's FORM, and the values are the values of these elements. |
DataEntryBis.html
$firstName = $_POST['firstName'] creates the $firstName variable, and assigns it the value of the 'firstName' INPUT field of the data entry form.
A problem arises when such a field is empty, or a checkbox is not checked. In this case, the related data is not transmitted to the server, and the corresponding key and value are not set in the $_POST array. For instance, if the checkbox 'riding' is not checked, the item $_POST['riding'] is not defined; then the statement $riding=$_POST['riding'] causes an error. |
A number of superglobal arrays are available to a PHP script; they are so called because they are accessible from everywhere. The $_POST superglobal array contains the data from a FORM using the POST method.
The TheEnd.html source page is shown below.
Its display looks is as shown on the right:
<HTML><HEAD> <TITLE>THAT'S ALL FOLKS</TITLE> </HEAD> <BODY> <DIV style="font-size:150%;font-weight:bold; color:red;text-align:center;background:yellow; padding:5em"> THE END</DIV> </BODY> </HTML> |
This example was intended to show how data from a client data entry form can be retrieved into a PHP script, on the server side.
1.3 Database access |
1.3.1 Database creation
CreateMyDbase.php (database access information to be defined)
A number of variables containing database access information are defined first:
The mysql_query function submits the SQL statement defined by its argument. CREATE DATABASE is the SQL statement which creates a database. It returns the boolean value of true if successful, false otherwise. The mysql_close function frees the resources held by the connection. A function which is often used to terminate a script when something goes wrong, is die. This function prints the message defined by its argument, and terminates the execution of the script. The message here is the value of the mysql_error function, which returns the latest message error of the MySQL server. The characters in black are HTML code which is sent to the client, unchanged. |
CreatePeople.php
The mysql_connect requests connection to the local host. The function invocation is followed by the statement 'or die (...)'. This syntax is of common occurrence. Let's see how it works.
The argument of the die function, under mysql_select_db is: |
The mysql_query function submits the SQL statement defined by its argument. CREATE TABLE is an SQL statement. Here it creates a table named 'people' into the database to which the script is currently connected. The columns of the table are defined within the parentheses: firsName, lastName, email, sex, etc.
The argument of the die function is composed of 2 parts, the constant string "Table NOT created<br>" and the function mysql_error. The "." (dot) sign is the concatenation operator in PHP.
DataInsert.html
On the left is the HTML code. The names of the INPUT elements stand out in blue. These names along with their values as entered by the user are sent to the server, when the user clicks on the SUBMIT button. To see how the page is presented to the user, please click here. If you installed the Apache Web server and the PHP processor as suggested in the introductory remarks to this section, clicking on the script name (on the left, above the script display) will request it. You have to install MySQL as described in Appendix 1, and run the two previous sample scripts. This supposes that you also created the user account and password to suit the values hard coded into the script that will be called next. |
Below is the PHP to be called when data are submitted from the client side.
|
<!-- PHPSelect.html --> <HTML><HEAD> <TITLE>MySQL SELECT</TITLE></HEAD> <BODY> Enter the name of the database and table to be queried: <FORM action="PHPSelect.php" method="GET"> <TABLE> <TR><TD>Database name: <TD><INPUT type="text" name="dbName"> <TR><TD>Table name: <TD><INPUT type="text" name="tableName"> <TR><TD> <TD><INPUT type="submit" name="button" value="SUBMIT"> </TABLE> </FORM> </BODY></HTML> |
Here is the HTML code.
The page has two data entry fields for the user to enter the names of the database and the table to query. These informations are sent to the server, to be processed by the PHPSelect.php script. To merely see how the page is presented, please click here. If you have set up your Web server as suggested, clicking on the page name (on the left, above the page display) will request it under PHP. |
The PHP page called to process the request is shown below.
PHPSelect.php -- not to be requested directly
The HTML/Javascript generated page Please click here to see a sample HTML page as can be generated. As this is a realistic example, the page has many lines. But these lines are repetitive. When you understand one in a group, you understand them all.In the display, the lines in green characters make up the HTML code that presents the results for the user to see. This code represents a number of text type INPUT elements set in a TABLE for presentation clarity. These INPUT elements are to receive the data to display. Their names are made to stand out in red. Remember that the text that shows in the INPUT fields, on the user's screen, is the character string assigned to the value attribute of the INPUT elements (this is HTML). Displaying data is achieved through the use of Javascript functions. In the HTML code, the lines pertaining to Javascript are in blue characters. The first block, repeated below, is the Javascript object which contains the whole table received from the server:
The object tableObject has the structure tableObject={kk:0, kx:7, A0:{..}, A1:{..}, ... A6:{..} } If you did not know what a Javascript object is, please don't worry. Just see how it is defined here, and how it is used below. Note that the name tableObject of the object defined at the first level, is followed by an = sign, whereas the names of the objects A0, A1, ... contained in tableObject are followed by a colon sign. The displaying of the data is controlled by a Javascript script assigned to the BUTTON labelled "DISPLAY" (named "push"). The button description with its associated onclick script is repeated below (click here to see the complete page again):
The property kk of the object tableObject is denoted tableObject.kk. This is Javascript object notation. On the left handside, the words record, firstName, lastName, etc... are the names of the INPUT elements of the HTML page. They identify the Javascript objects that represent these elements. Whereas tableObject is defined above in the script, element objects such as record, firstName, etc. are implicitly defined by Javascript for certain types of elements. The names of these objects are the values of the element name attributes. The attributes of an element are the properties of the corresponding object. For example, the value attribute of the INPUT element 'record' is represented by the value property of the object 'record' and is denoted record.value. The text attribute of the INPUT element 'email' is represented by the text property of the 'email' object, and is denoted email.text. The onclick attribute is assigned a script which is executed when the button is clicked. Please, click here to see how the page is displayed, and how the onclick script works (please click on the 'DISPLAY' button to see). The index of the next row to display is readily held in the kk variable of the tableObject object. The script assings the values of this row to the INPUT elements value attributes, and increments the kk index to make it ready for the next click. It does the following:
As an example of how column values are assigned, let's look at the assignment of the firstName INPUT element: The notation firstName.value on the left handside, represents the 'value' attribute of the firstName INPUT element. It is the text displayed in the firstName field. The argument of the eval function, on the right handside, is the expression composed with 3 terms as follows:
firstName.value="tableObject.A"+tableObject.kk+".firstName"; the value displayed on the user's screen would be the text "tableObject.A3.firstName". Using the eval function, you assign the value of this expression to the left handside. You have the same result as though the resulting string is directly coded in the page: firstName.value=tableObject.A3.firstName; (without quotes) This is the magic of the eval function. Now, tableObject.A3.firstName, is the firstName property of the A3 object, which is a property of the tableOject object (this again is Javascript object notation). Its value, as seen in the tableObject description above, is "Mary". Generating the HTML/Javascript page on the server side Here are now the pages used to produce the above HTML page with Javascript code.
The page called from the above, PHPModify.php, derives from PHPJavascript.php of the foregoing example. Sequences are added to define new control buttons and data. Please click here to see the new code, where the old Javascript code is in green. The new sequences are as described in the following.
The for loop walks through all of the columns from the database, and:
The PHPSql.php page which is requested for the handling of the SQL statement is as follows:
Normally these tags are:
Optionally, the opening tag can be shortened to
or the tags can be set in the ASP style:
These options are to be authorized by special directives in the PHP configuration file. Nowadays, the text document containing the PHP codes is generally an HTML page, because HTML is the most widely accepted document type. In an HTML page, PHP codes can also be enclosed within the <SCRIPT> tags like this:
In a text document including an HTML page, the PHP code need not lie between the <HTML> and </HTML> tags. There can be PHP codes before and after the HTML page.
The requested PHP page is processed by the PHP processor, in the server host, resulting in a processed page which is sent back to the user's browser, for displaying. The user is the client of the request.
Also, keep in mind that Javascript is a script that runs on the client side. Therefore the variables defined in the PHP script are not available for reference. To use these variables, you have to generate (by printing out) the statements that assigns their values to Javascript variables. For example, if you wish to use the value of a $var PHP variable, you would create a Javascript variable, say xxx, then write out the statement that, in the Javascript program would assign it the value of $var:
In the resulting page, you would have:
xxx = 'var_value' This is illustrated in 1.3.5 and 1.3.6 above. A simple illustration is to be found in 2.8 below. Finally generating a good HTML page with Javascript scripts is a matter of good HTML and Javascript designing. PHP can be viewed as simply the means to generate the designed page.
print or echo function. However, PHP does not mix with XML as easily as it does with HTML.
To request a PHP page, you enter its Internet address in this field, then click the sending button. If you do not know which it is, just press the 'ENTER' key on your key board, it generally works. For example, you can enter http://localhost/hpp/PHPInfo.php. Details on the format of a request can be found in Appendix - 1.3.2 Requesting a file.
2.2.1 Data types In computations you commonly use 3 types of data:
The numeric data seen in the samples in the present chapter are integers, represented by string of digits. Other types of numeric data will be seen in the next chapter. String data are strings of characters enclosed within single or double quotes The 2 boolean values are noted true and false, without quotes.
Numeric data are used in arithmetic operations such as addition, subtraction, multiplication, division, etc. String data are used in string operations such as concatenation, search, splitting, etc... Boolean data are used in logical operations such as AND, OR, etc. or may be tested for their value
But in PHP a datum is not precluded from being used in operations of another type. Depending on the operation they are involved in, the data have a value of the type required by the operation: they have a numeric value in an addition, a string value in a concatenation, a boolean value in a logical operation or a test for Thus, numeric data can be concatenated. In this case, each of them is used for the digits they are composed of. String data can be used in arithmetic operations. If they start with a number (e.g. "123ABCD"), this number is used as the numeric data (123 in the example). If not they have the numeric value of 0. Numeric or string data can be used in a boolean operation. Boolean values are assigned as follows:
Boolean data can be used in numeric or string operations:
This will be illustrated in below. 2.2.2 Variable names and types A variable name is preceded by the $ sign. The first character in a name is a letter or an underscore. This is followed by an unlimited number of characters which can be alphabetic, upper or lower case, numeric, underscore, or any character with ASCII code from 127 to 255, inclusively (the latter are also referred to as "letters" in PHP documentation). See 3.3 below for a summary. As there is no real distinction between the different types of data, a given variable can be assigned a number, a string or a boolean value, as needed. A variable can be a scalar containing one value, or an array containing multiple values. The values in an array are identified by a key.In the arrays shown in the foregoing examples the keys are character strings. A key can also be a number. A character string key is called an associative index. A numeric key is called an number index . A key and value pair is called an item or an element. The word item is to be preferred, because so many other things are called elements.
An item is designated by appending its key designation enclosed within square square brackets, to the name of the array. Thus:
By putting an item designation on the right side of an = sign, you assign a value to it. This also creates the array if it did not exist. This is one of the ways to create an array. Examples -- consider the sequence:
In the third line, the index is a character string, or associative index. The square bracket can also be empty, as in the fourth line. In this case the index is numeric, and has as a value the next available, i.e. that of the highest in use, incremented by 1. Here, it is 6. The values assigned to the different items of an array can be a mix of numeric, string data or boolean data. Actually as will be seen, the value of an item can be a data of any type. The key can only be a string or a number.
Superglobal arrays used in the present chapter contain the data received in a message processed by the GET or the POST method:
Data in a message have a name and a value, in the form name=value. The names make up the associative indices of the array items. The values are assigned as values to the items.
Usually the messages come from a FORM element of an
Conditions are used in control statements, such as if ... else, for, while, etc... Two common ways of expressing a condition are:
Conditions expressed as a comparison are common sense. Example: $x = $a < 10 More generally, any boolean data can be used as a condition. Finally, as in PHP data of any type have a boolean value, any datum can be used as a condition.
Of course, all of the common arithmetic operations are available:
So are the common AND and OR logical operations. Concatenation is the only string operation. The other operations on strings are performed through a function, as will be seen in the next chapter.
The increment operator ++ operates on a single variable which it increments by 1. Example: More operations are examined in the next chapter.
2.5.1 Expressions explained | |||||||||||||||||||||||||||||||||||||||||||||||||||||||||||||||||||||||||||||||||||||||||||||||||||||||||||||||||||||||||||||||||||||||||||||||||||||||||||||||||||||||||||||||||||||||||||||||||||||||||||||||||||||||||||||||||||||||||||||||||||||||||||||||||||||||||||||||||||||||||||
| 10 | a numeric constant |
| "this is a string" | a string constant |
| $a < 10 | a boolean datum |
| $var | can be of any data type |
Some more complex expressions are:
| ($a+10)*$x | a numeric expression |
| $b.10 | a string expression |
| "Database $dbname opened!" | a string expression within double quotes |
| 'Database $dbname opened!' | a string expression within single quotes |
An expression can be evaluated, carrying out the operations indicated by the operators. The result is the value of the expression.
In the above, the first example is a numeric expression: 10 is added to $a, then the result is multipled by $x, giving the final result.
The second is a string expression: the string value of $b is concatenated with the characters "10".
The third is a string expression within double quotes, which mixes string constants and a variable. As the variable is within double quotes, it is expanded before the expression is evaluated. If $dbname is "mydatabase", then the value of the expression is
Database mydatabase opened!
The fourth is a string expression within single quotes. The variable is not expanded. The value of the expression is
Database $dbname opened!, whatever the value of $dbname is.
The fifth involves an assignment operation. It assigns a value to the variable $row. But it also has a value which is the value assigned to $row
The last is a logical expression which involves two functions linked by the OR operator.
2.5.2 Precedence
When evaluating an expression, the operations are executed in the order defined by their precedences. Operations of the same precedence are executed from left to right.The operators exemplified in the above are given in the following table, by decreasing precedence order. Operators of the same precedence are in the same line, separated by a space
| Operators | |
| ++ | increment |
| * / | multiplication, division |
| + - . | addition, subtraction, concatenation |
| = | assignment |
| OR | or |
The logical expression mysql_connect($dbname) OR die("Unable to connect to $dbname") seen above is usually part of an assignment expression like this:
$link = mysql_connect($dbname) OR die("Unable to connect to $dbname")
Precedence is important to know, to determine how the whole expression is evaluated. To see the precedence table, please, click here. The = operator is seen to have a higher precedence than OR. Therefore, the expression is evaluated in the following order:
| - | $link = mysql_connect($dbname) is evaluated first, i.e. the result returned by mysql_connect is assigned to $link |
| - | the expression remaining to evaluate is link$ OR die ("Unable to connect to $dbname") |
| - | if mysql_connect did return the connection to the database server, the result has a boolean value of true, so the remaining expression is ascertained to be true, without any need to go further; the evaluation stops here |
| - | if mysql_connect fails to set up the connection, it returns false, in the expression to evaluate, the first term $link is false. The second term die("Unable to connect $dbname") has to be evaluated, i.e. the die function is called. It usually returns true, but as it also terminates the script, what it returns is generally unimportant. |
There is another operator for "or". This is || which has a higher precedence than = (see precedence table). Let's look at how the processor evaluates an expression like:
$link = mysql_connect($dbname) || print("Unable to connect to $dbname")
The processing order is:
| - | first mysql_connect($dbname) || print("Unable to connect to $dbname") is evaluated |
| - | if mysql_connect returns a connection, the expression is ascertained to be true; else the print function is called; if no problem arises, it returns true; therefore this expression is generally the boolean true |
| - | the $link variable is assigned a boolean value which is true if print has no problem. |
| - | the whole expression has the value assigned to $link (therefore, true of false) |
2.6 Functions |
| - | the PHP core functions which are always available |
| - | the extended functions provided by extension modules |
The echo function has the syntax:
echo (string_expression) |
The print function has the syntax:
print (string_expression) |
The die function has the syntax:
die (string_expression) |
The eval function has the syntax:
eval (string_expression) |
2.6.2 The MySQL extended functions
The extension functions used in the chapter are from the MySQL module. They are the following:mysql_connect | connects to the MySQL database server |
mysql_select_db | connects to a database |
mysql_query | submits a SQL statement |
mysql_num_rows | retrieves the number of rows contained in a query result |
mysql_num_fields | retrieves the number of columns contained in a query result |
mysql_fetch_array | retrieves the next row from the query result |
mysql_data_seek | sets the pointer in the query result, for the next row reference |
mysql_free_result | frees the resources held by the query result |
mysql_error | returns the latest MySQL error |
mysql_close | closes the connection to the database server |
Unless otherwise stated, the functions return the value true when successfully executed, false when the execution fails.
The mysql_connect function (connect to a server) has the following syntax:
mysql_connect(host:port, username, password) |
| host | identifies the host where the database server is -- this can be the host name or its Internet Protocol address like 192.123.212.12
|
| : | (colon) is coded as is, if the opional port argument is present |
| port | is the number of the port that the database server is monitoring for incoming requests -- this value defaults to 80 |
| user | is the user name under which the script requests a connection to the server |
| password | is the password assigned to the user name |
The mysql_select_db function (connect to a database) has the syntax:
mysql_select_db(databasename) |
The mysql_query function (submit a SQL statement) has the syntax:
mysql_query(statement) |
The mysql_num_rows function (return result row number) has the syntax:
mysql_num_rows(result) |
The mysql_num_fields function (return result column number) has the syntax:
mysql_num_fields(result) |
The mysql_fetch_array function (returns a result row) has the syntax:
mysql_fetch_array(result, indexMode) |
| result | is the result table returned by a mysql_query function | ||||||
| indexMode | indicates the type of index that can be used to identify an element in the returned row. It can have the values:
|
| - | the first time it returns the first row |
| - | after the last row has been returned, it returns the boolean value of false |
| - | the next row to be returned can be set by the mysql_data_seek function |
The mysql_data_seek function (set next row in the result table) has the syntax:
mysql_data_seek(result, next_row) |
| result | is the result table returned by a mysql_query function |
| next_row | is the number of the next row to be accessed when a function such as mysql_fetch_array is executed (the first row has the number 0). |
The mysql_free_result function (free resources) has the syntax:
mysql_free_result(result) |
The mysql_error function (return the latest MySQL error message) has the syntax:
mysql_error() |
The mysql_close function (close a server connection) has the syntax:
mysql_close(link) |
Further details are to be found in the reference manual
| if ... else | depending on the outcome of a test, executes one set of statements or optionally another |
| for | execute a loop until an ending condition is met |
| while | execute a loop as long as a condition is true |
2.7.1 The if ... else statement
if (condition) {
  if_statements
}
else {
  else_statements
}
|
| condition | is a condition |
| if_statements | is a set of statements executed if the condition is true |
| else_statements | is a set of statements executed if the condition is false |
2.7.2 The while statement
while (condition)
{
   loop_body
}
|
| condition | is a condition tested at the beginning of each iteration
| ||||
| loop_body | is the set of statements to be executed at each iteration, enclosed within curly braces |
2.7.3 The for statement
for (initial_set ; condition ; end_set)
{
   loop_body
}
|
| intitial_set | is a set of comma separated statements, executed once before the first iteration | ||||
| condition | is a condition tested at the beginning of each iteration:
| ||||
| end_set | a set of comma separated statements, executed at the end of each iteration | ||||
| loop_body | set of statements to execute at each iteration, enclosed within curly braces; the curly braces may be omitted if the set contains only one statement |
2.7.4 More ...
Other statements are investigated in the next chapter.The reference document can be consulted for more ...
2.8 Illustration |
|
One remark about the arguments of the print functions following the if ($e) test. They are enclosed within single quotes so that the $e do not expand into the value of the $e variable (within double quotes, to print the $ sign you have to escape it as \$).
In the next line, $c is within single quotes. But then the single quotes are within the outer double quotes. Therefore they are data characters, not quote operators.
3. Syntax summary |
| Normal | Opening tag | <?php | (recommended) |
| Closing tag | ?> | ||
| Short opening | Opening tag | <? | |
| Closing tag | ?> | ||
| ASP style | Opening tag | <% | |
| Closing tag | %> |
| - string as numeric: | the starting characters if numeric, else, 0 |
| - string as boolean: | true if exists and non-empty, false if empty |
| - numeric as string: | digit string |
| - numeric as boolean: | true if non-zero, false if 0 or not a number |
| - boolean as numeric: | 1 if true, 0 if false |
| - boolean as string: | 1 if true, empty if false |
$variable_name |
| $ | $ sign to appear as is | ||||||||
| variable_name | has the following structure:
|
Array element -- using square brackets:
$varname[number] $varname["string"] | numeric index or key string index or key |
| Numeric | + | addition |
| - | subtraction | |
| * | multiplication | |
| / | division | |
| String | . | (dot sign) concatenation |
| Boolean | AND | the first operand is evaluated first, if false the evaluation is terminated, the result is false |
| OR | the first operand is evaluated first, if true the evaluation is terminated, the result is true |
| " | double quote -- enclosed variables are expanded, enclosed functions are evaluated |
| ' | single quote -- enclosed characters are data, no variable expansion or function evaluation |
| Core functions | print | writes out the argument to the result page |
die | writes out the argument to the result page and terminates the script | |
| MySql functions | ||
mysql_connect | mysql_connect($host, $username, $password) connects to the MySQL database server | |
mysql_select_db | mysql_select_db($databasename") connects to a database | |
mysql_query | mysql_query($statement) submits a SQL statement | |
mysql_num_rows | mysql_num_rows($result) retrieves the number of rows contained in a query result | |
mysql_num_fields | mysql_num_fields($result) retrieves the number of columns contained in a query result | |
mysql_fetch_array | mysql_fetch_array($result, indexMode) retrieves the next row from the query result | |
mysql_data_seek | mysql_data_seek($result, next_row) sets the pointer in the query result, for the next row reference | |
mysql_free_result | mysql_free_result($result) frees the resources held by the query result | |
mysql_close | mysql_close($link) closes the connection to the database server |
if (condition)
| - condition to be tested - if_statements executed if condition is true - else_statements executed if condition is false The curly braces may be omitted when statement set contains just one statement |
| for (initial; condition; end_loop) {loop_statements} | - initial: comma separated statement set, executed before the first loop - condition tested before each loop - end_loop comma separated statement set, executed at the end of each loop - loop_statements statements composing the loop |
| while (condition) { loop_statement } | - condition tested before each loop - loop_statement statements composing the loop |
